Categories
2020 - Winter

Avocado Toast with a Twist

Avocado Toast with a Twist
©️Leah Didisheim

  Author: Leah Didisheim


Ingredients (for 1 person):

  • 1 avocado
  • ½ lemon (more or less)
  • 150g of button mushrooms (champignons de Paris)
  • Your favourite bread (about 4 slices)
  • Olive oil to cook

Spices:

  • Cayenne pepper
  • Salt
  • Pepper
  • Provence herbs mix
  • Garlic powder

Recipe:

Heat up your oven on 50/70°C and put your bread in it (you don’t have to wait for the oven to be hot). (You could also toast your bread or just keep it the way it is if you prefer.)

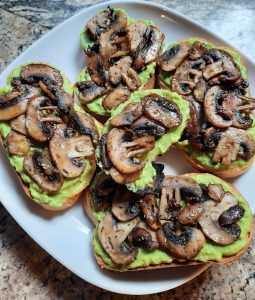
Wash your mushrooms, cut off the bottom of the tails and slice them. When that’s done, heat up a pan to maximum heat with olive oil in it. When hot, put the mushrooms slices in and turn down your heat a bit. Wait for the mushrooms to soak up in oil – add some if needed (which I always do); a disturbing amount is needed. When the slices begin to shrink and all have oil on them, add all of the spices according to your liking (you can use other spices if you prefer, these are just the ones I always use). Stir the mushrooms from time to time (reduce the heat if needed) and take them off the heat when cooked (I personally like them a tad crispy) and set them aside.

Then (or while your mushrooms are cooking), take your avocado and cut it in half. With a spoon, take the avocado flesh, cut it in small pieces and put the pieces in a bowl. Take a fork and mash it all up. When there are no more chunks of avocado, press half a lemon and add it to the mixture. Before mixing it all up, also add some cayenne pepper and mix the spices and the lemon juice a bit. When that’s done, mix it all together.

Take your bread out of the oven (or before if it was already crusty, which is what we’re aiming for – check it a few times while preparing your other ingredients) and cut it in slices.

Put the slices on a plate and spread the avocado mixture on top of each slice. On top of that add some of the mushroom slices and you’re good to go!

You can add more or less of all the ingredients depending on how much you eat and the taste you like best; these are only suggestions.

Bon appétit!

Categories
2020 - Winter

Chocorange Cake

Chocorange cake
“Chocolate ring shaped cake” by the Italian voice is licensed under CC BY 2.0

Author: Katharina Schwarck


This is a recipe for the absolute yummiest cake I have ever made and ever eaten in my whole entire life. It will make you drool, it will warm your heart, it will make you want more. You don’t believe me? Try it yourself.


Ingredients for a cake pan of 28 cm:

120g soft butter or margarine

140g sugar

4 egg yolks


1 teaspoon cocoa powder

120g dark chocolate, grated

1 orange

            its zest

            3 tablespoons juice


4 egg whites

1 pinch of salt

2 tablespoons sugar

150g ground peeled almonds

60g zwieback


Preparation (about 30 minutes):


  1. First of all, you’ll need to preheat your oven to 180 degrees Celsius. You can also take out a cake pan and grease it already. Then, you take 120g of butter, shortly (very shortly!) put it into the microwave or leave it in the kitchen to heat up a little. Put the butter in a bowl, stir in the 140g of sugar and the egg yolks, (don’t forget to keep your egg whites for later!), continue stirring until the mixture turns light. Finely grate the 120g of dark chocolate (you can do so by just cutting it up with a big knife on a cutting board), add the orange zest and squeeze in 3 tablespoons of juice (or basically your whole orange). Add the cocoa powder and mix thoroughly.


In a different bowl, beat the egg whites with the salt until it’s stiff, add 2 tablespoons of sugar and continue beating briefly until the beaten egg whites are shiny and bright like your future :).


  1. Grind the 60g of zwieback finely by crushing it in a plastic bag with a rolling pin or something similar (I used to take them and break them with my hands over a bowl when I was little. I do not recommend). Mix with ground peeled almonds if you like them and you’re not allergic (or take the risk, you never know).


  1. Now, mix the chocolate-orange mix with the zwieback-almond mix. Then, pour layers of the beaten egg whites onto the mixture, carefully fold them in with a rubber scraper (carefully, I’m serious.) and fill the finished dough into the prepared form.


  1. Bake in the lower half of the oven for about 50 minutes. Remove, leave it to cool a little, take the cake out of the mould, and let it cool some more on a rack.


  1. To finish off your beautiful soul-warming cake, you can either throw some powdered sugar on top of your creation or, if you’re feeling artsy, cover it with jam (apricot, more orange, or whatever you think would taste good) and add some orange slices. For the second option, warm up the jam in a small pan with some water, pass the mixture through a sieve, and spread the cake with it.


  1. Enjoy!


PS: if you adapt the heat and time a little, the dough can also perfectly be made into little muffins.

Categories
2014 - December

Peanut Butter Cookies

Image: © Corinne Morey

Author: Corinne Morey

Peanut Butter Cookies

For all those of you who love peanut butter, this recipe is your jackpot. These cookies are truly my all time favourites. But be careful, once you start you cannot stop, I guarantee it.

This recipe is given in American measures (cups and spoons). But do not be frightened. 1 cup = 230ml. So grab a cup about this size and you’re good. Spoons is easy. Table spoon is a soup spoon. Tea spoon is a normal spoon. And there you go! American already!

Preparation: about 45min

Makes about 2 ½ dozen cookies

Ingredients

  • ½ cup granulated white sugar
  • ½ cup granulated brown sugar
  • ½ cup peanut butter
  • ½ butter softened (=125gr)
  • 1 egg
  • 1 ¼ cups normal flour
  • ¾ teaspoon baking soda
  • ½ teaspoon baking powder
  • ¼ teaspoon of salt
  1. Heat oven to 180°C.
  2. In a large bowl, beat sugars, peanut butter, butter and egg with electric mixer on medium speed or with a spoon until well blended. Stir in flour, baking soda, baking powder and salt.
  3. Take two clean table spoons or your hands in order to shape little balls of 3-4 cm of dough that you place on your baking sheet/pan. Leave at least 3 cm between each ball.
  4. Flatten each ball with a fork in a crisscross pattern like on the image. Do not press to hard. Cookies should stay about 3-5mm thick. If you wish you can sprinkle a little sugar on the cookies in order to give them a crystal shiny finish.
  5. Bake 9 to 10 minutes or until light brown. Cool for 5 minutes then remove from cookie sheets to cooling rack.

 Enjoy! 

Categories
2014 - December

Chocolate Chip Cookies

Image: Photo © Wikimedia Commons. Source

Author: Corinne Morey

Chocolate Chip Cookies

You’ve all probably heard of the mythical Chocolate Chip Cookie Dough ice cream from Ben&Jerry’s. Perhaps you did not understand why Americans would create such a weird flavor. Well my dear friends, once you’ll have followed this original recipe, you will quickly understand America’s national enthusiasm for this dough. And to be totally honest here, tasting the dough when making pastries is clearly one of the best parts. Just saying.

This recipe is given in American measures (cups and spoons). But do not be frightened. 1 cup = 230ml. So grab a cup about this size and you’re good. Spoons is easy. A tablespoon is a soupspoon. A teaspoon is a normal spoon. And there you go! American already!

Preparation: about 55 minutes

Makes about 4 dozen cookies

Ingredients:

  • 3?4 cup granulated white sugar
  • 3?4 cup granulated brown sugar
  • 1 teaspoon vanilla
  • 1 cup softened butter (= 125gr of butter)
  • 1 egg
  • 2 1?4 normal flour
  • 1 teaspoon baking soda (=bicarbonate de sodium, easy to find at the pastry shelf in your food shops)
  • 1?2 teaspoon salt
  • 1 1?2 to 2 cups of dark chocolate chips
  1. Heat oven to 180°C.
  2. In a large bowl, beat sugars, butter, vanilla and egg with an electric mixer on medium speed, or a spoon, until well blended. Stir in flour, baking soda and salt (the dough will me quite stiff and sticky). Stir in chocolate chips.
  3. Take two clean table spoons or your hands in order to shape little balls of 3-4 cm of dough that you place a your baking sheet/pan.   Like this!
    Chocolate Chip Cookies
    shape the cookie dough into small balls

    Leave at least 4 cm between each ball! The cookies will flatten with the heat and take much more space.

  4. Bake 8-10 min or until light brown. Cool 1 or 2 minutes (but not very long) and remove cookies from sheet to a cooling rack. If you wait longer, the cookies may stick to the pan.
  5. Repeat the shaping and cooking process until no more dough is left in your bowl.

Enjoy!

Categories
2014 - December

Building Your Very Own Gingerbread House

Image: Photo © Flikr.com

Author: Rebecca Frey

Gingerbread House(s)


Here’s a recipe for all those who want to get their hands not necessarily dirty but into some real tasty dough. After all the essay writing this should be a welcome change and I can assure you, baking can be quite relaxing! And if on top of that, you want to impress your friends and family and get back in touch with your inner child, here you go: 

This recipe is for about 10 people or lets rather say a whole gingerbread village! Feel free to reduce the ingredients if you don’t want your home to be overloaded with a Hansel and Gretel atmosphere… Plan two days for this adventure: preparation time is roughly 2 hours but you have to let the dough rest over night!

Ingredients:

dough

  • 700g honey
  • 200g sugar
  • 200g butter
  • 2 eggs
  • lemon zest
  • 2 tablespoons coca powder
  • 2 little bags of gingerbread spice
  • 1 kg flour
  • 2 tablespoons bicarbonate of soda
  • 5 to 6 tbsp of milk
  • 4 tbsp baking powder

icing

  • 2 egg whites
  • 300g icing sugar
  • 6 drops of lemon juice
  • 1 vanilla pod

decoration

  • flower for the working plane
  • powder sugar
  • various sweets for decoration

How to go about it:

  1. gingerbread dough
  • melt honey, sugar, butter in water-bath, mix slightly with a wooden spoon, cool down
  • whisk together with eggs, lemon zest, coca powder and spices
  • add flour and mix well
  • in a cup dissolve the bicarbonate of soda in 3 or 4 tablespoons of milk
  • in another cup dissolve the baking powder in the rest of the milk
  • incorporate in both and knead together to a smooth dough
  • wrap the dough in transparent film and leave to rest over night at room temperature
  1. bake the gingerbread forms
  • (preheat your oven at 180°C)
  • on the next day quickly knead the dough again
  • spread out the dough 1 to 2 mm thick with a rolling pin on a floury working plane
  • draw templates for the roof and walls of your ginger bread house on cardboard, cut them out, check if your elements assemble nicely
  • put the templates on your spread out dough and cut along the edges with a sharp knife
  • use the rest of your dough to cut out chimneys, a door, Christmas trees, or any kinds of cookie shapes to decorate your gingerbread house
  • put all the forms on baking tray covered with baking foil and bake at 180°C for 5 to 10 min

Various Gingerbread house templates

simple: 2 triangles for the back and front, 2 rectangles for the roof

more complex: 2 pentagons for front and back, 2 rectangles for the roof, two rectangles for the sides

Rebecca’s Gingerbread templates

  1. icing
  • while your gingerbread is baking prepare the icing
  • whisk egg whites until stiff
  • add icing sugar and whisk till nicely thick and creamy
  • add lemon juice and vanilla (cut open the vanilla pod with a knife and scrape out the seeds)
  • fill the icing into a piping bag
  1. build the gingerbread house
  • prepare a solid and flat surface (for example thick cardboard covered in tin foil, or a tray of some sorts)
  • when your gingerbread forms are finished baking and have cooled down start building the houses by using the icing as glue to stick together walls and roof
  • let the house dry for at least half an hour before decorating
  • use the rest of your icing, sifted icing sugar and various sweets for decoration

Enjoy! And send us pictures of your magnificent Oeuvre!

 Love,

Muse