December 1 – Automatic import from Web of Science

Serval now periodically monitors the latest publications belonging to UNIL/CHUV published in Web of Science. When Serval finds ORCID identifiers in the metadata of the publications and that these identifiers have been linked to Unisciences by one of our authors, it adds the relevant links and sends a message to the linked persons.

The message invites authors to check their list of proposals. They will then be able to import the records into Serval in a few clicks. A video tutorial showing the steps to follow is available.

If you want to benefit from this feature, don’t forget to create your ORCID profile, to communicate it to your editor when you publish your next article and to link it to Unisciences. This will ensure that the publications are yours and reduce the likelihood of an incorrect email being sent.

5 December – My SNSF report

You can now generate a list of publications that follows the format required by the SNSF for any new request for funds in a few clicks!

The “My SNSF report” feature allows anyone affiliated to a UNIL research unit to create a list of research results in the format requested by the Swiss National Science Foundation.

Indeed, the SNSF requires all applicants to provide a standardised set of information when applying for new funding. This includes a list of research results that can be generated from Serval and that meets the requirements of the SNSF.

You will find more information about InfoSERVAL as well as in the video tutorial that will show you how to work on your document to facilitate the layout of the publication list.

Importing records

Video tutorial (EndNote and BibTex)

Video tutorial (ORCID)

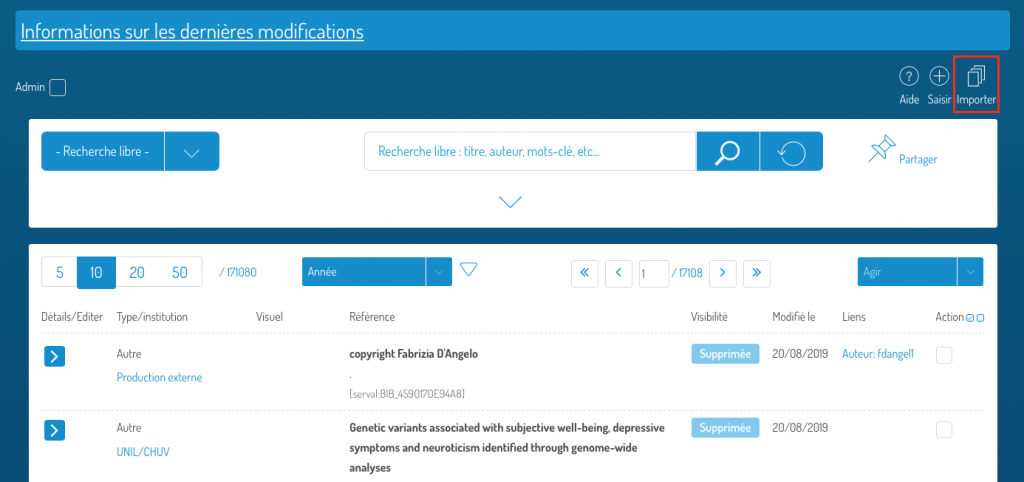
Click on the “Import” button on the main Serval screen.

You will then be prompted to choose the format of the data source to be imported (2), to browse your computer and find the file in the correct format (3) and to define the institution in which the publications were made (4). You can always cancel the import using the “Go back” icon (1).

If you choose “my ORCID folder” as the data source (and you have linked your ORCID profile with Unisciences), then your ORCID ID will be displayed and you can click on “List my publications”.

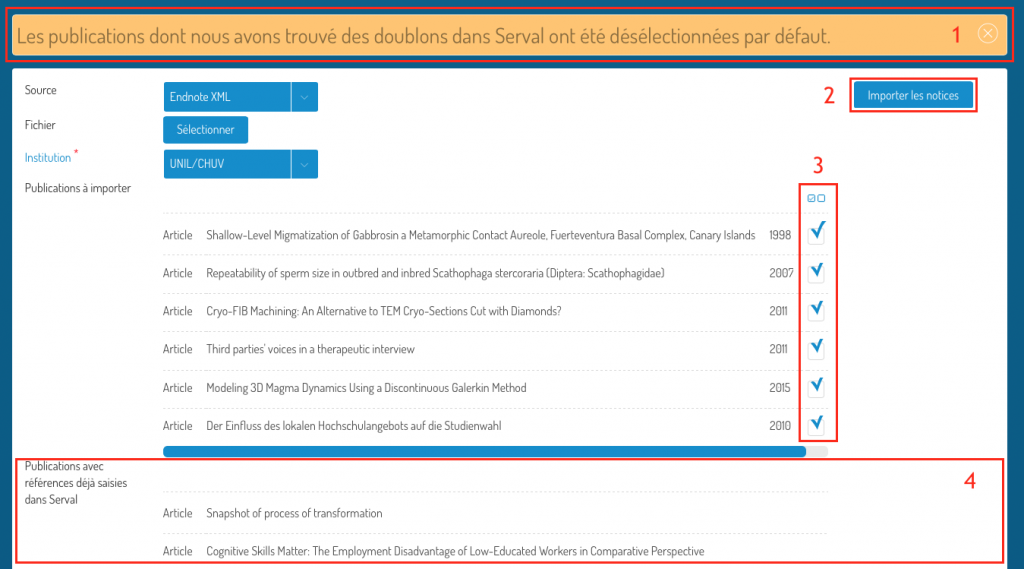
Regardless of the format chosen to import, the list of recovered publications will be displayed (1). A duplicate search is performed at this time, and publications that have already been found in Serval are unchecked by default (4).

Choose which publications you want to import from among those that have not been found in Serval. To do this, tick the boxes to the right of each publication (3) and press “Import records” (2).

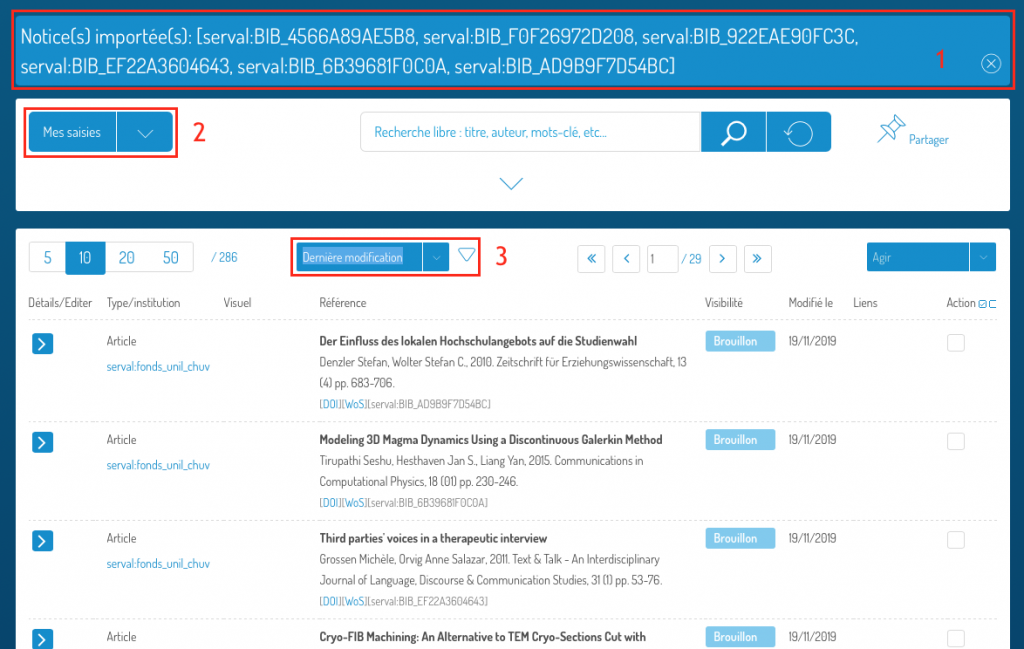
You will find the recently created records (1) in your Serval profile “My entries” (2). Don’t forget to sort your entries by “Last changes” (3). Note that records will be created in Draft form and you must edit them to complete them (add links, add full text) and publish them.

Back to top

Changing the type of a record

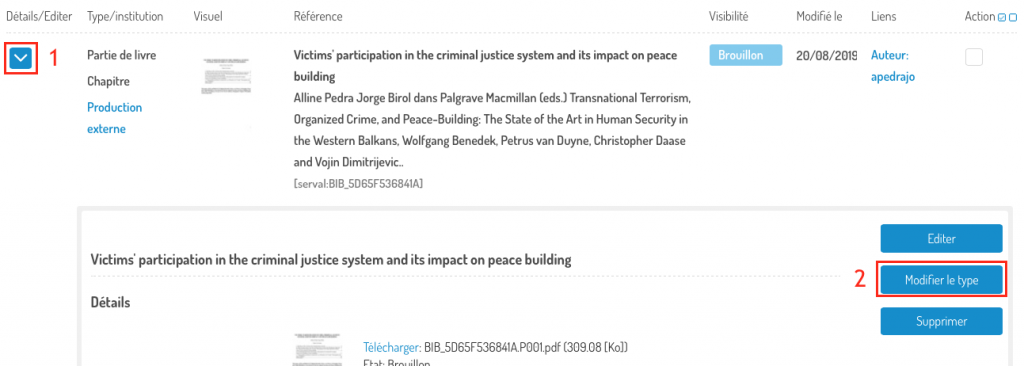
Go to the editing (advanced entry) of the record in question by pressing the blue chevron (1) in the “Details/Edit” column, then press “Change Type” (2).

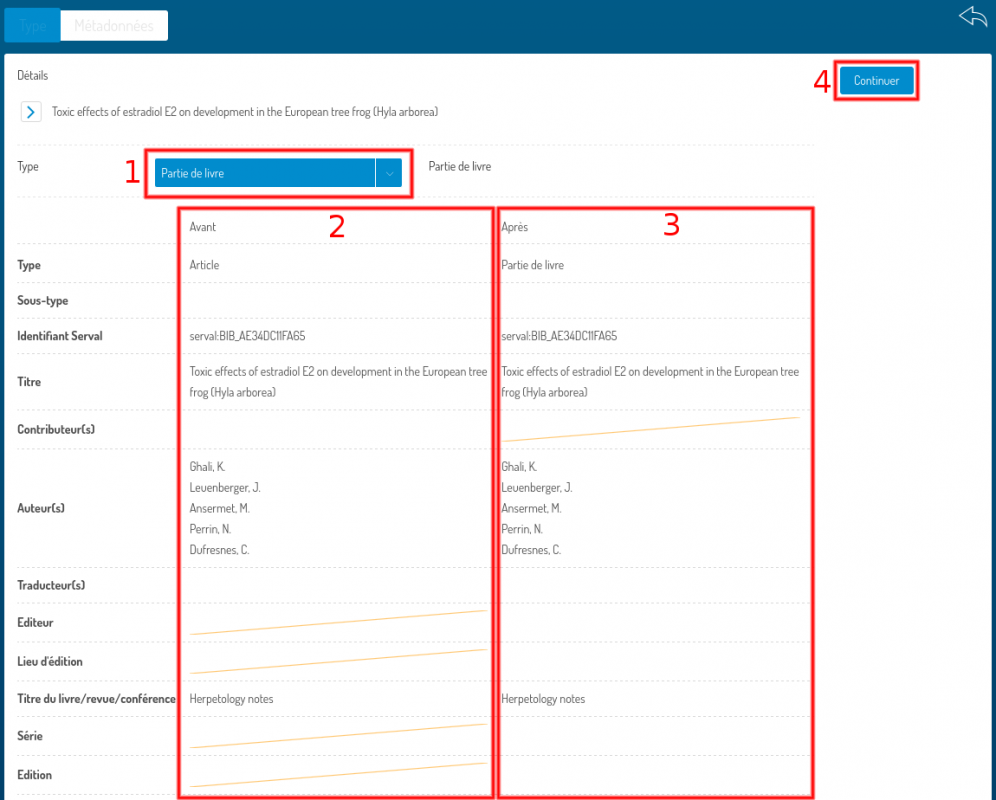
Choose the type of publication (1) in which you want to convert this publication. The “Before” (2) and “After” (3) fields allow you to see the changes that will be made during the conversion. Once you are sure of your choice, click on “Continue” (4).

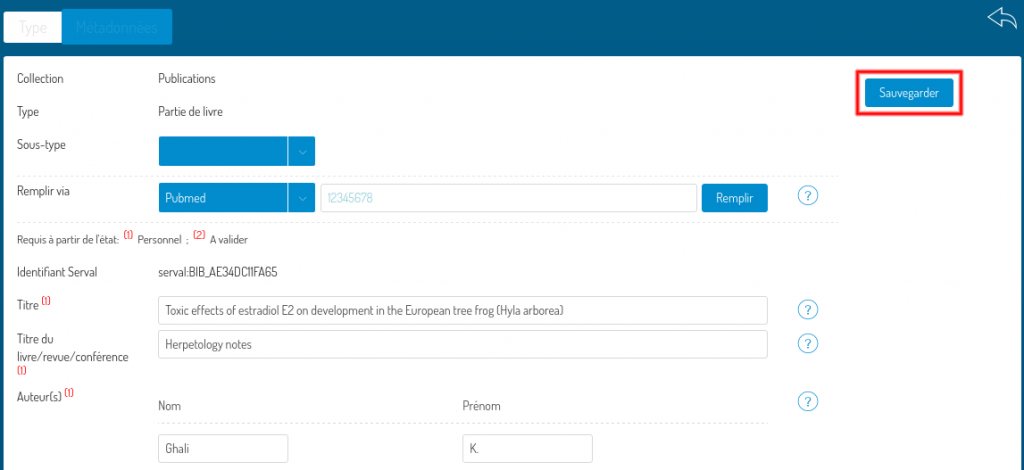
Adapt the metadata to match the new type selected. Then click on “Save” to save the type change and metadata changes.

Go to top

Linking your ORCID account with Unisciences

Video tutorial

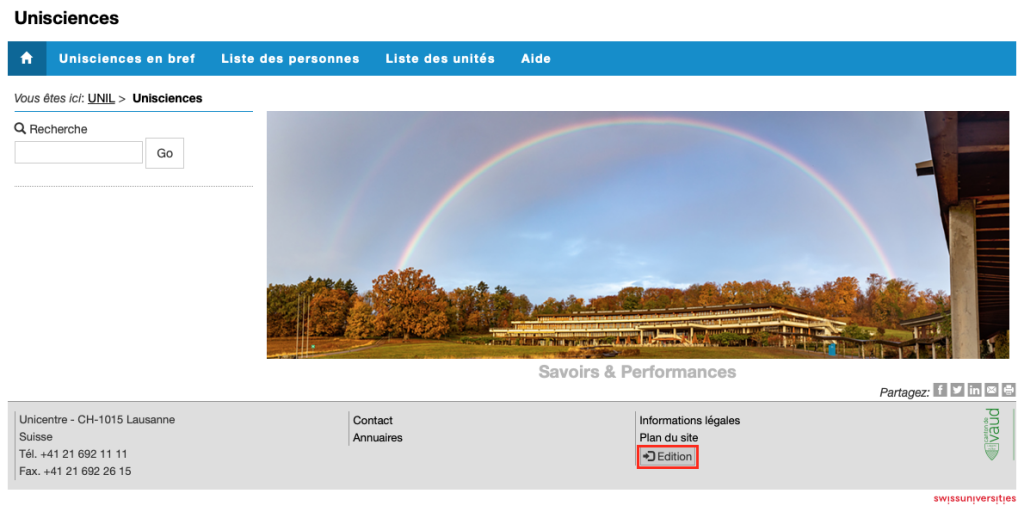
Create your ORCID profile (if you don’t yet have one) on https://orcid.org and log into Unisciences (link at the bottom of the page). Watch the video above to find out why it is a good idea to create your ORCID profile and link it to Unisciences.

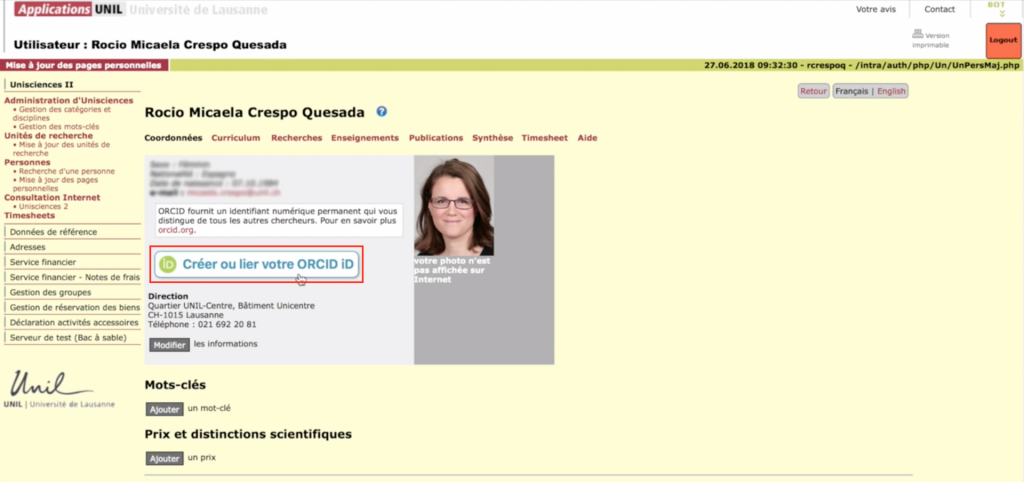
Press the “create or link your ORCID iD” button:

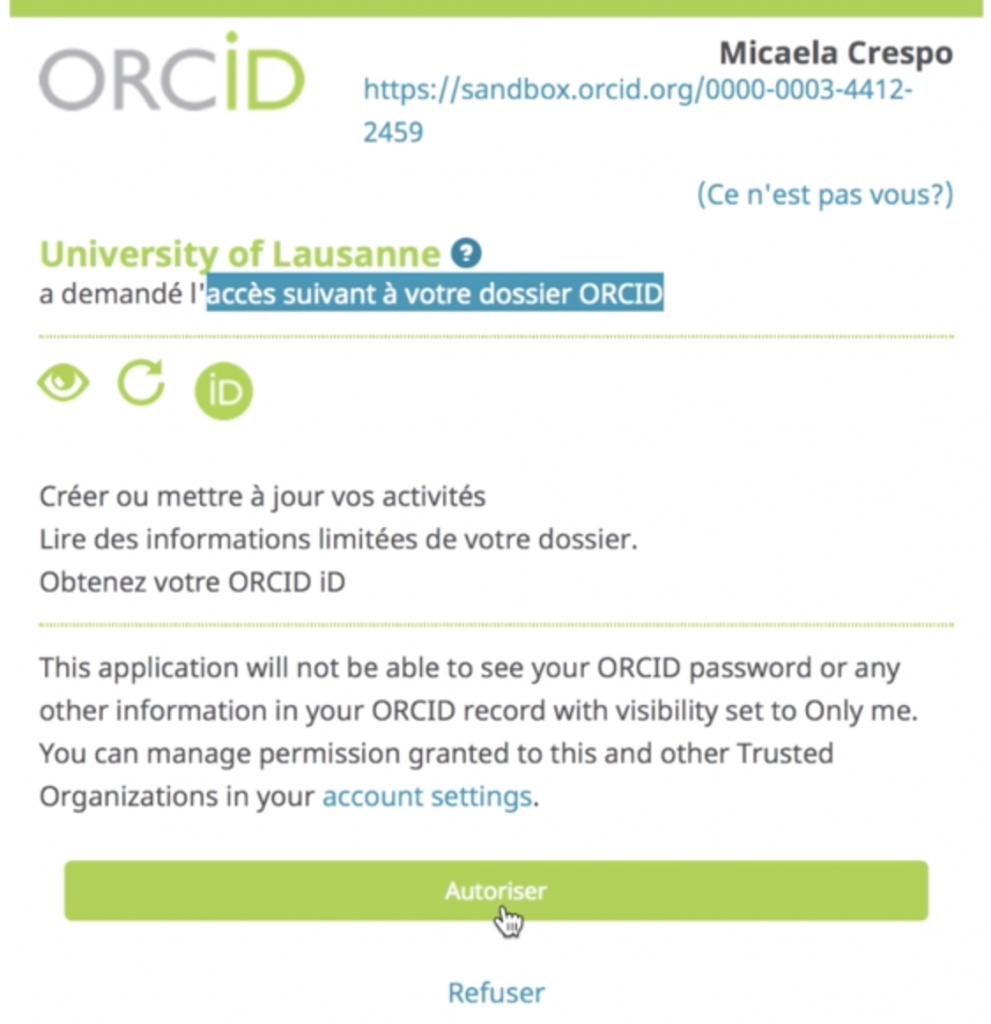
Allow UNIL to access your ORCID profile. If you were not logged in to ORCID, you will first be prompted to authenticate in ORCID.

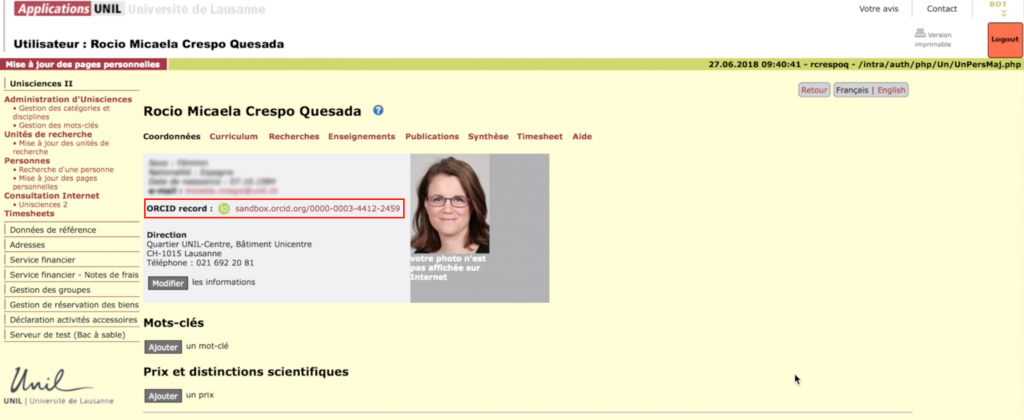
Your ORCID profile and Unisciences are now linked. You can import/export between ORCID and SERVAL as well as benefit from an improved author identification system in SERVAL (if you publish with your ORCID and your publisher includes this data in the article metadata).

Back to top

Exporting records

Video tutorial 

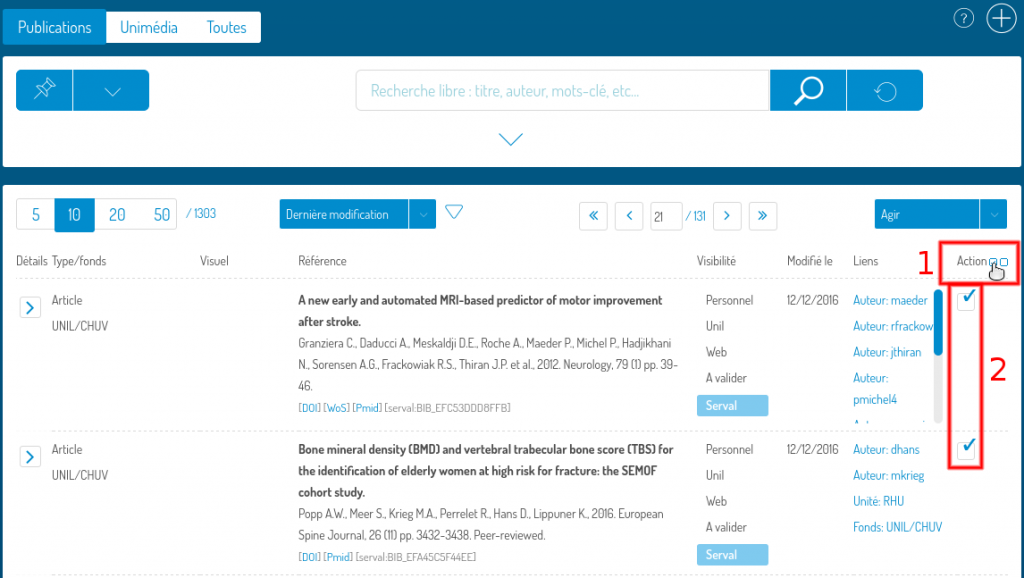
To export some of the results obtained during your last search, select the publications to be exported by using the “select all” button (1) or by checking each publication concerned (2).

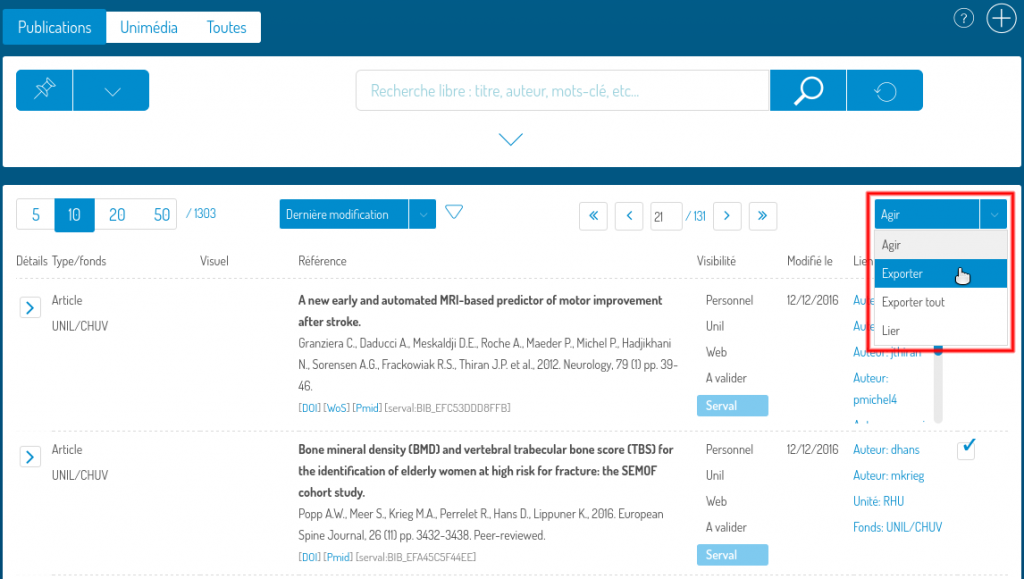
If you wish to export the previously selected publications, choose “Export” from the “Act” menu.

If you want to export all the results found, choose “Export All”. The “Export All” choice is only available from myUnil.

Then choose the export format (1) and click on the “Export” button (2).

The available formats are:

  • Endnote XML (to export your list of publications to Endnote)
  • BibTex (to export your publications to citation management software)
  • ORCID (to export your list of publications to ORCID).

To find out how to link your UNIL profile to Unisciences (and thus be able to export/import from ORCID), follow this link.

Pour importer le fichier Endnote XML créé dans Serval dans Endnote

  • Go to the “File” menu and choose “Import”.
  • In the “Import Options” list, select “Endnote Generated XML”. Depending on your version of Endnote, you must first click on “Options” to access it.

Back to top

Adding and/or correcting links (to persons, units and/or groups)

Video tutorial 

Go to the editing (advanced entry) interface of the record in question by pressing the blue chevron (1) in the “Details/Edit” column, then press “Edit” (2).

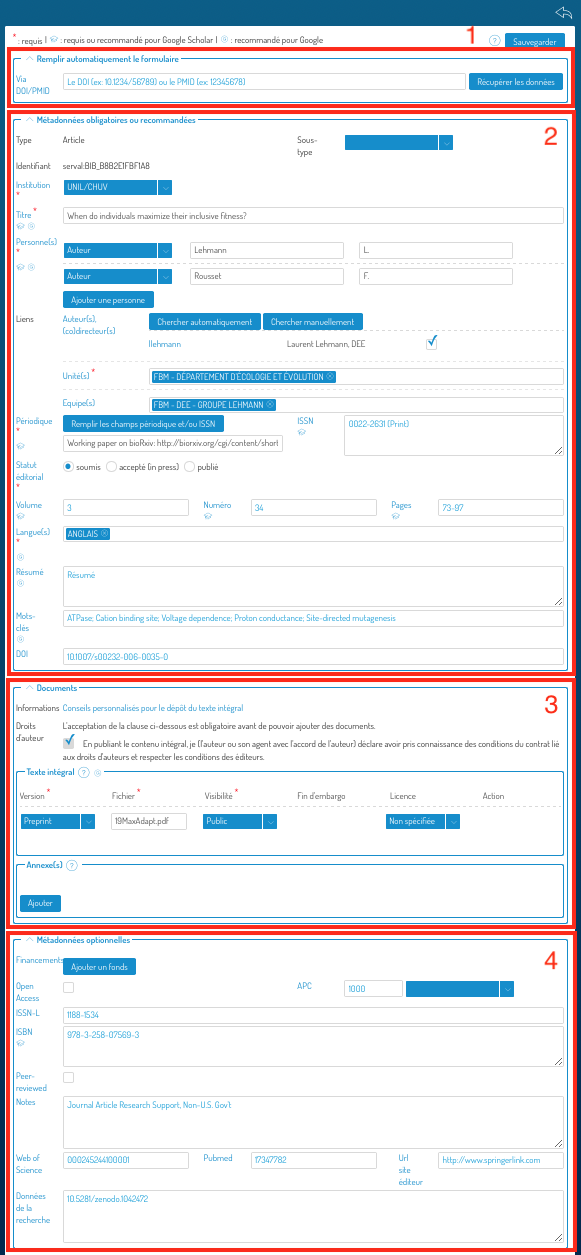
You are directed to the advanced entry (editing) interface with all its sections deployed:

  1. Filling in the form with an identifier;
  2. Mandatory or recommended metadata;
  3. Documents (full text and secondary documents);
  4. Optional metadata.

Each section can be deployed or condensed using the chevron to the left of the section name:

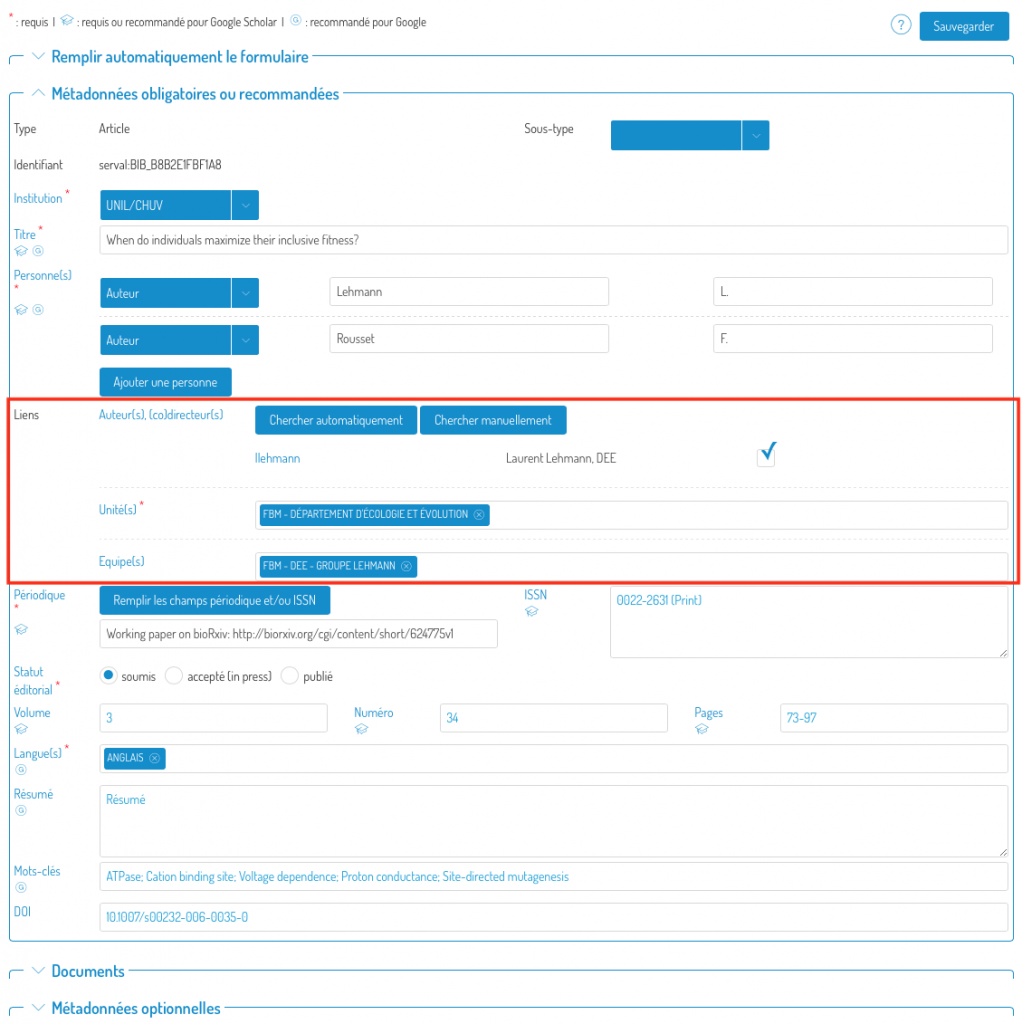
Go to section (2) where the links are located:

What are links for?

  • They allow you to link your publications to your profile (which will be displayed in Unisciences).
  • They also allow you to assign your publications to the unit where you conducted the research on which your publications are based. The Unisciences page of your unit will therefore also be complete.
  • You can also link your co-authors, who can then also take control of the leaflet and possibly complete it.

Link people to the notice with automatic proposals

Proposals for links to people (if found from the names in the “Person(s)” field (1)) will be displayed by pressing the “Search automatically” button (2). When you tick the authors’ boxes, their units will automatically be added to the “Unit(s)” (4) field.

Adding a unit is done by typing its name directly into the “Unit(s)” field (4). It is also possible to link the record to a search group by typing its name directly into the “Team(s)” field (5).

If an author of the publication has not been found automatically, you can add him/her by using the “search manually” button (3).

Manually link people to the record

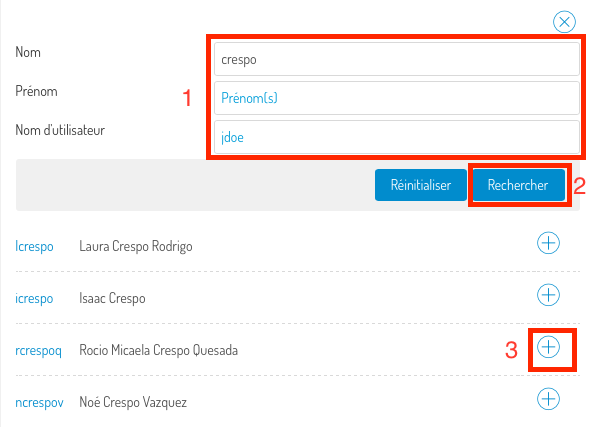
In the pop-up window, type the name and/or first name and/or ID of the person you are looking for (1) and click on “Search”.

Once you have found the person, click on the “+” symbol next to his name, and the link will be added to the record.

Don’t forget to save your changes by pressing the “Save” button at the top right or bottom of the screen.

You can cancel the changes at any time by pressing the “Go back” icon.

Go to top


Adding of a full text and/or secondary documents

Video tutorial

Go to the editing (advanced entry) interface of the record in question by pressing the blue chevron (1) in the “Details/Edit” column, then press “Edit” (2).

You are directed to the advanced entry (editing) interface with all its sections deployed:

  1. Filling in the form with an identifier;
  2. Mandatory or recommended metadata;
  3. Documents (full text and secondary documents);
  4. Optional metadata.

Each section can be deployed or condensed using the chevron to the left of the section name:

Go to section (3), Documents.

In this section, you can either add a full text (or secondary documents) if there were none yet, or correct the metadata associated with the documents.

Adding a full text (PDF) or secondary documents

To find out your rights and obligations regarding the self-archiving of a copy of your publication, follow the links provided in the “Information” field (1).

Then check the “Copyright” box (2) and press “Add PDF” (3).
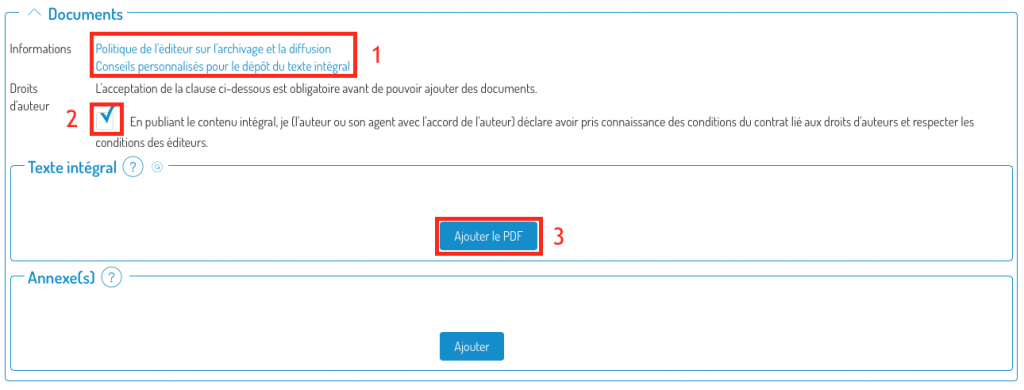
You can then browse your computer to choose the PDF to add.

Then choose the version of the manuscript you are submitting (in case of doubt, consult this link) and the visibility of the document (restricted UNIL – by default -, public or under embargo). If you choose “under embargo”, a calendar is displayed in the “end of embargo” column to be able to specify the end date of the embargo. You also have the possibility to define the document’s license, if you know it.

Correction of metadata associated with a document

You can also modify the metadata associated with a document:

Correct the metadata: the version of the manuscript you are submitting (in case of doubt, consult this link) or the visibility of the document (restricted UNIL – by default -, public or under embargo). If you choose “under embargo”, a calendar is displayed in the “end of embargo” column to be able to specify the end date of the embargo. You also have the possibility to define the document’s license, if you know it.

Don’t forget to save your changes by pressing the “Save” button at the top right or bottom of the screen.

You can cancel the changes at any time by pressing the “Go back” icon.

Go to top