|
|

|
|
|
|
|
|
|
Facility News
Spring is here 🌱 ! The days are getting warmer and the ☀️ is finally showing up ! Thanks to our modern buildings with tons of windows, the brightness and warmth of it all will make it feel like you're on a holiday ! We're not at the stage of bringing you cocktails (other than antibody ones 😉) but we might start considering it !
|
In this month FACS Tips, Kevin is walking us through an OMIP panel design process and the reasoning behind each steps. Not everyone designs a 28 color panel but there are nonetheless valuable lessons and information for all our users! Enjoy your read 😊
|
|
Louis Stavard won the mug of the month below, congratulations to you ! Please come by to our office at the SE-C Biopole to pick it up !
|
|

|
Please try to answer our quiz it and get a chance to win our next mug of the month ! Good luck to you all !
|
|
|
|
FACS Tips
|
|
|
How to build an OMIP, and more Panel Design Solutions from the Experts
|
Recently I had the pleasure of attending a Spectral Panel design course taught by some of the leading experts in cytometry. In this course we overviewed many of the factors that can make or break a good spectral cytometry experiment: single stains, autofluorescence, unmixing, and data analysis.
|
One particularly valuable session was delivered by Dr. Thomas Liechti, who walked us step-by-step through the development of his 28 colour OMIP-051 B cell and myeloid characterization panel (link). What made this especially useful was that his workflow was machine-agnostic, applicable to essentially any spectral platform.
|
While we have discussed panel design many times previously, it’s a topic that deserves revisiting. The field is constantly evolving, and sometimes conventional thought around topics change with new information.
|
For example, the philosophy of the panel design process is very similar to the Panel Design newsletter we did years ago (link), but this was published before we had access to AI tools like EasyPanel that have simplified and automated this process. Also, we have new ways of calculating spread and predicting errors.
|
It’s important to say though that AI can accelerate panel building. It cannot replace critical thinking. Understanding why certain fluorophores are better suited for certain markers prepares you to interpret your data properly and troubleshoot when things inevitably go wrong. This is why this workflow by Dr. Liechti is so valuable as it keeps us involved in every step in the panel design process while keeping AI tools available for validation and refinement.
|
Below is a simplified version of the workflow presented in the course. Importantly, this entire process can be done in a spreadsheet before touching a single tube.
|
1 - Purpose of the Panel
Every marker in your panel must have a purpose. If you can’t clearly articulate why a marker is included, it probably shouldn’t be there.
|
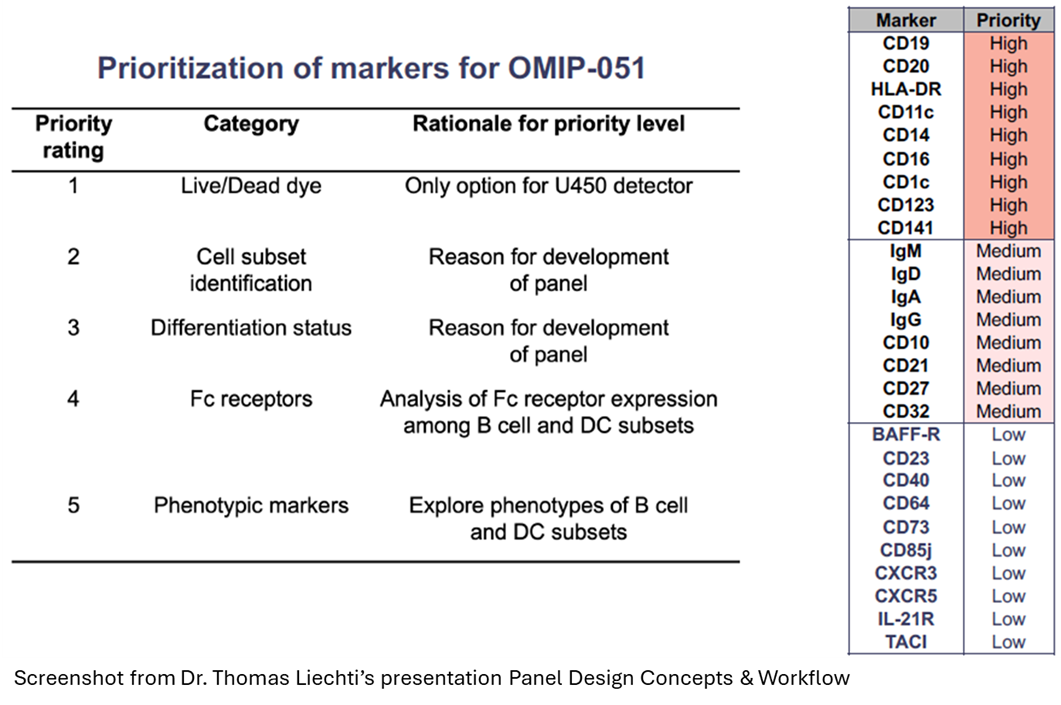
Markers should be graded by priority:
|
Which ones are essential? Which are exploratory?
|
Simultaneous detection of many co-expressed markers increases complexity. Knowing your analysis strategy before panel design prevents downstream frustration.
|
|
Not every fluorophore is created equally, and some are much brighter than others. Knowing ahead of time your priorities in terms of what cell populations or expression levels are most important is crucial to make sure these markers get the best fluorophores.
|
|
|
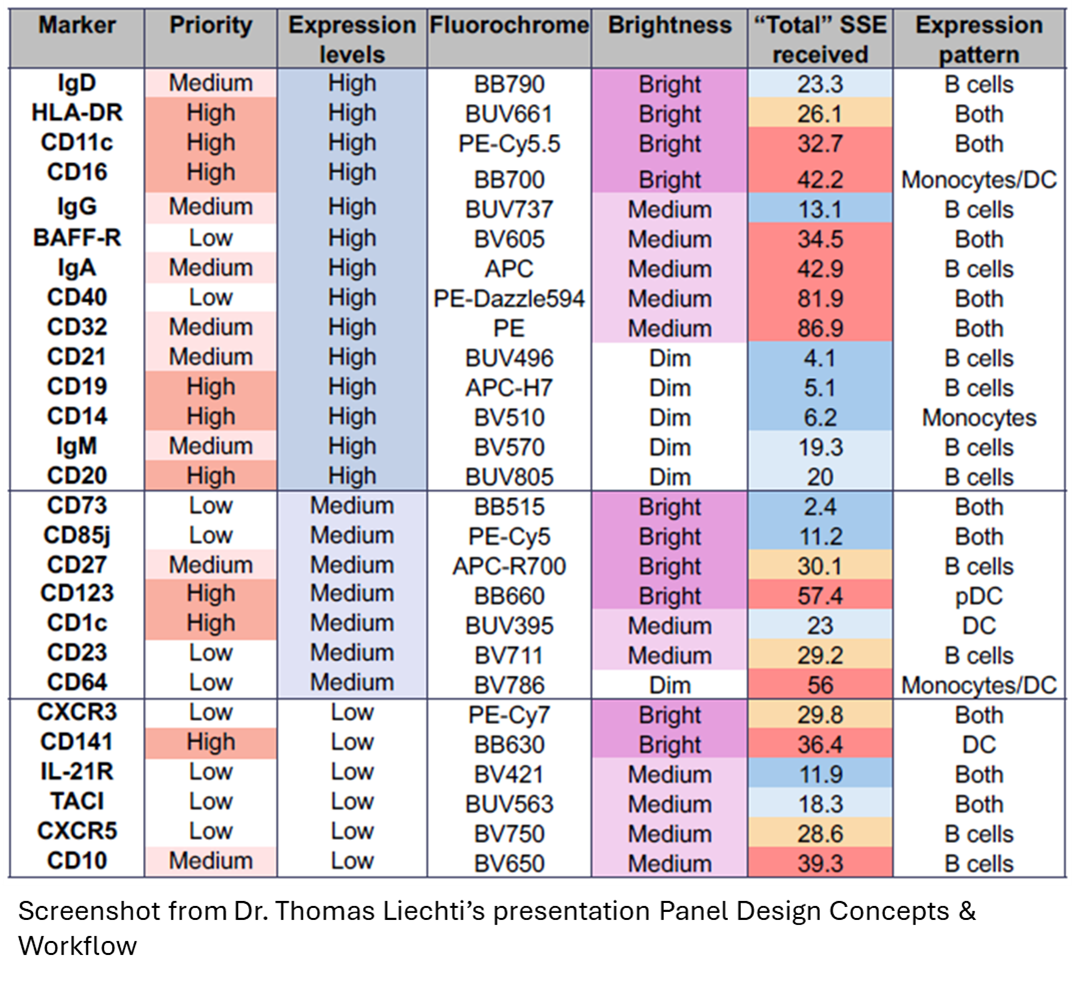
In OMIP-051, each marker was graded on a priority scale before any fluorophores were assigned.
|
2 - Expression Level
|
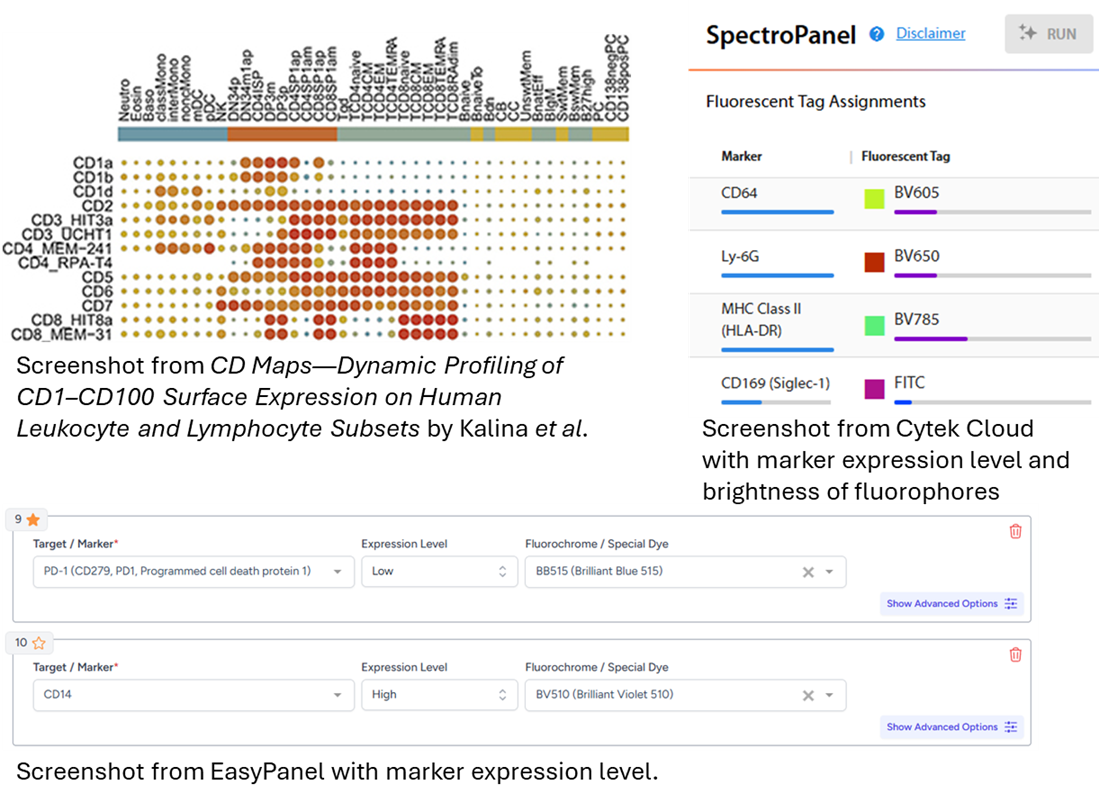
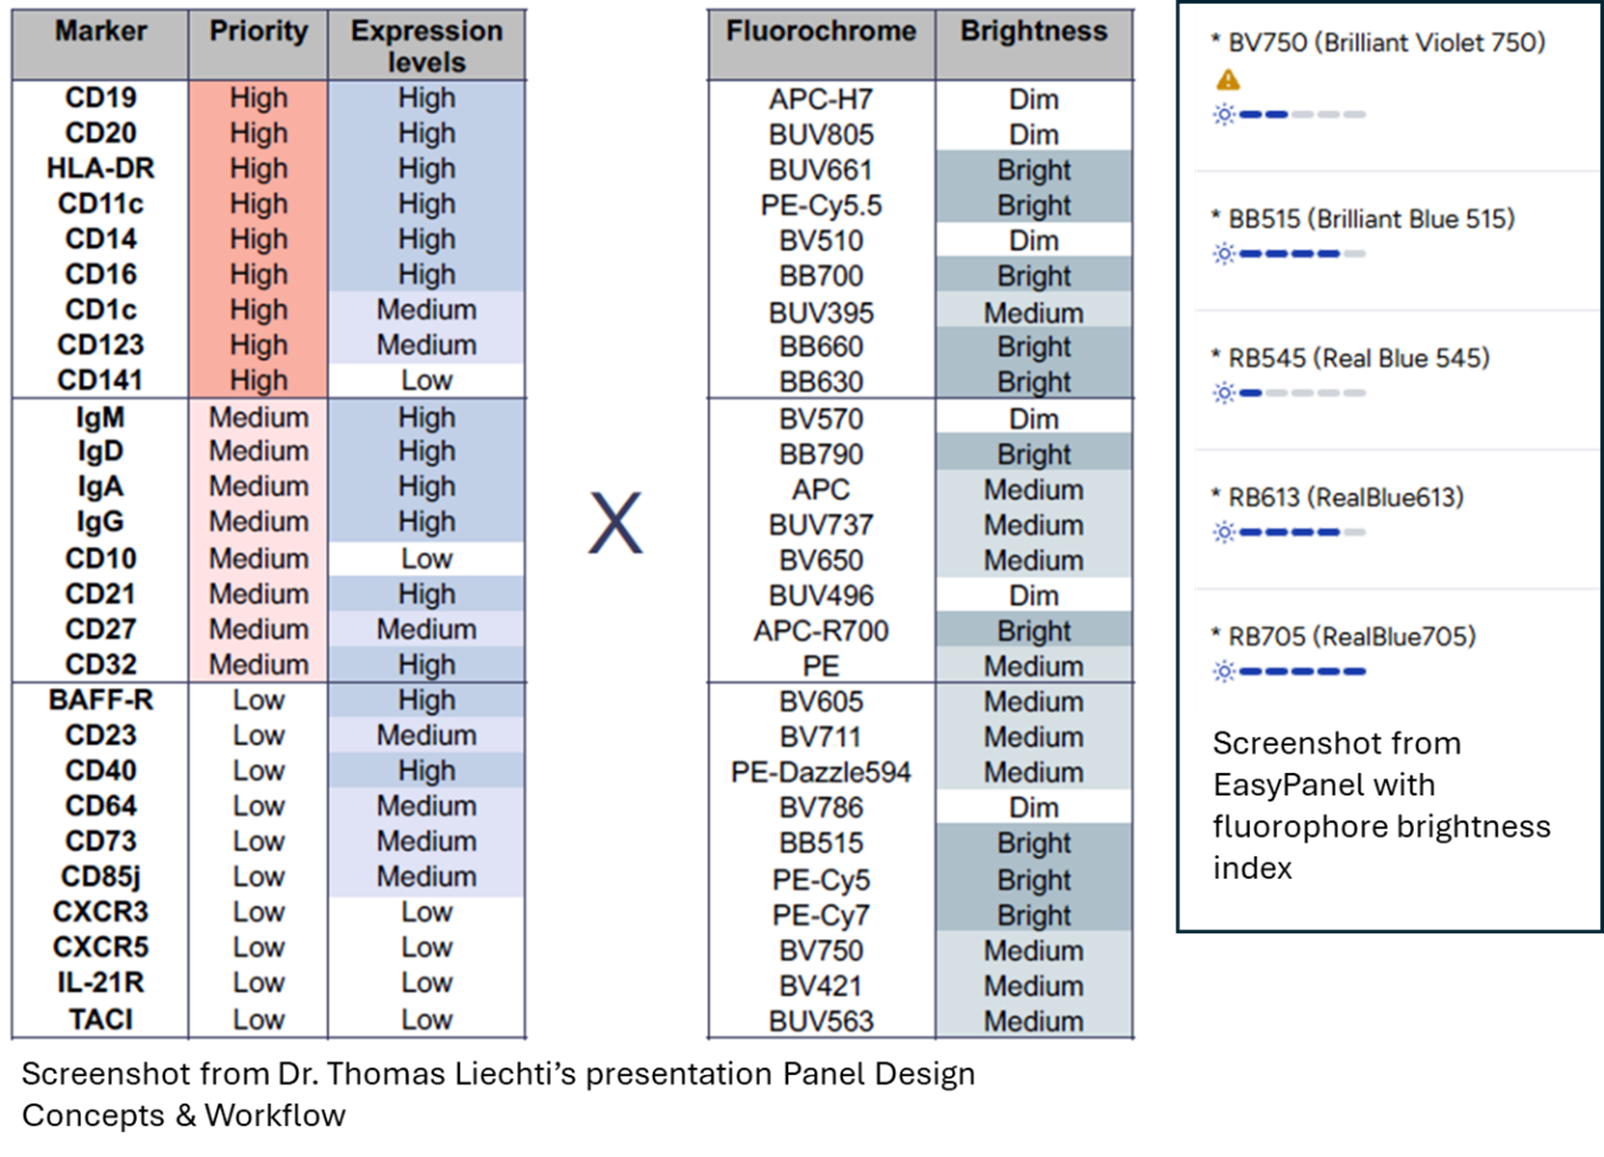
Next, Dr. Liechti took time to determine the antigen expression level of each of the markers and graded it as high, medium, and low. Each of the markers will express at different levels and those differences need to be taken into account for panel design.
|
|

|
|
Information on the levels of antigen expression can be found in many places. Kalina et al. published information about antigen densities for CD1 to CD100 (link), but also from vendors panel design tools such as BD and Cytek. EasyPanel will give you this information as well during the design process.
|
|
|
|
The strategy here is to assign high expression markers to dimmer fluorophores, reserving your brightest fluorophores for difficult to detect markers or rare populations, starting with those of highest priority.
|
|
|
The problem with placing bright fluorophores on high expression markers is it increases the possibility that spreading error could hurt your marker resolution in other channels. Also by saving bright fluorochromes on low expression markers, we give ourselves the best chance at resolving these hardest to determine and potentially most critical populations.
|
While this will come up again in more detail below, it is also important to avoid pairing high expression markers with bright fluorophores that also have a large amount of Spillover Spreading Error (SSE).
|
3 - Spillover Spreading Error
|
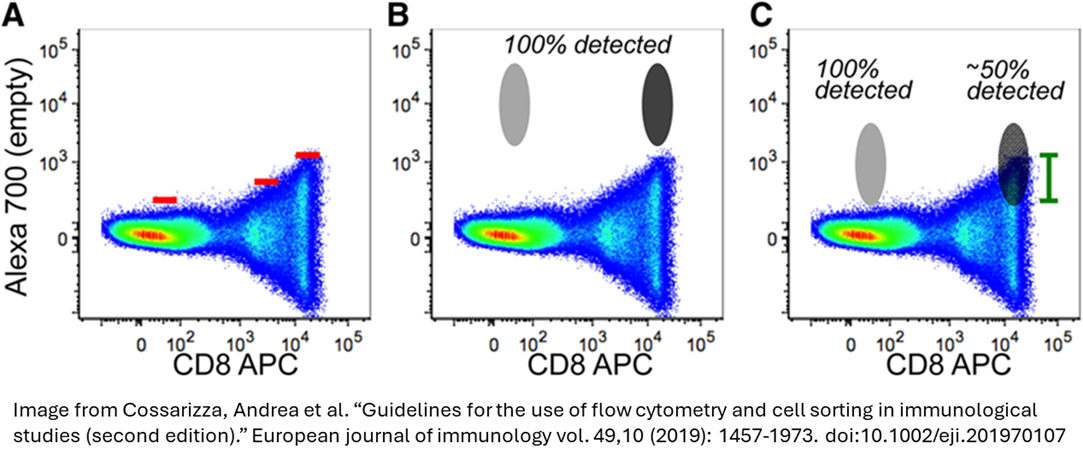
Spreading error can quietly destroy resolution, especially in co-expressing populations, and that is the next assessment made in Dr. Liechti workflow. For this step it is essential to know the co-expression of markers, as it is critical to avoid putting markers with high degree of spillover on co-expressing cells. Spillover can hide dimly positive populations, so any double positive cells can disappear in the trumpet looking spread on a dot plot, and that is what needs to be avoided.
|
|
|
It’s important to clarify here that this is not an unmixing error, but a panel design flaw, and no amount of updated unmixing or fresh single stains will solve this.
|
|
This concept can be difficult to predict before we get the opportunity to see the results. But it is still important to evaluate as best as possible beforehand to avoid truly problematic areas on the spillover spreading matrix (SSM). Again, most panel building apps from various vendors offer some SSM or similar for panel evaluations.
|
|
|
|
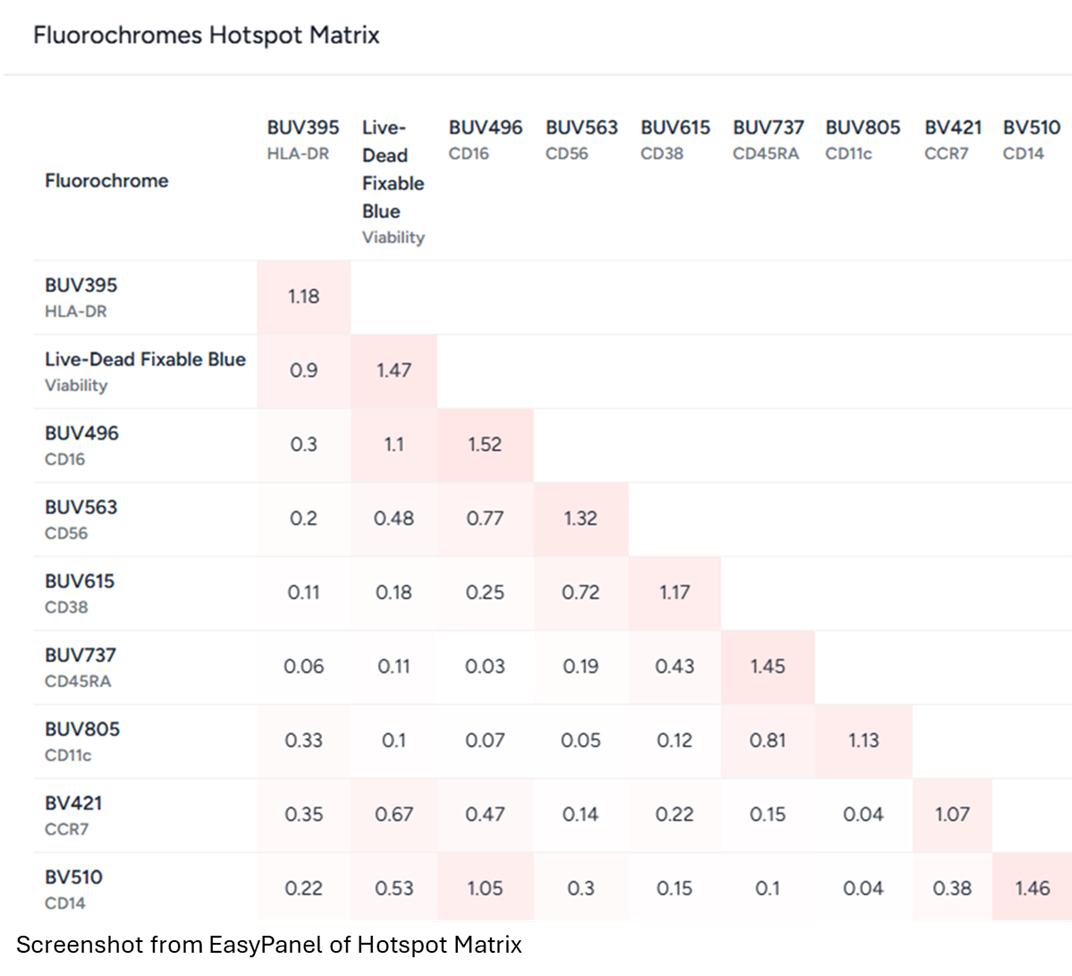
EasyPanel for instance includes a Hotspot matrix which considers the spreading along with other factors that are essential for identifying problem areas in a prospective panel.
|
|
|
In the example provided here, Dr. Liechti calculated the amount of SSE received in each channel in a more global context and ensured heavily spreading markers were balanced across the different cell types.
|
4 - Expect Iterations
|
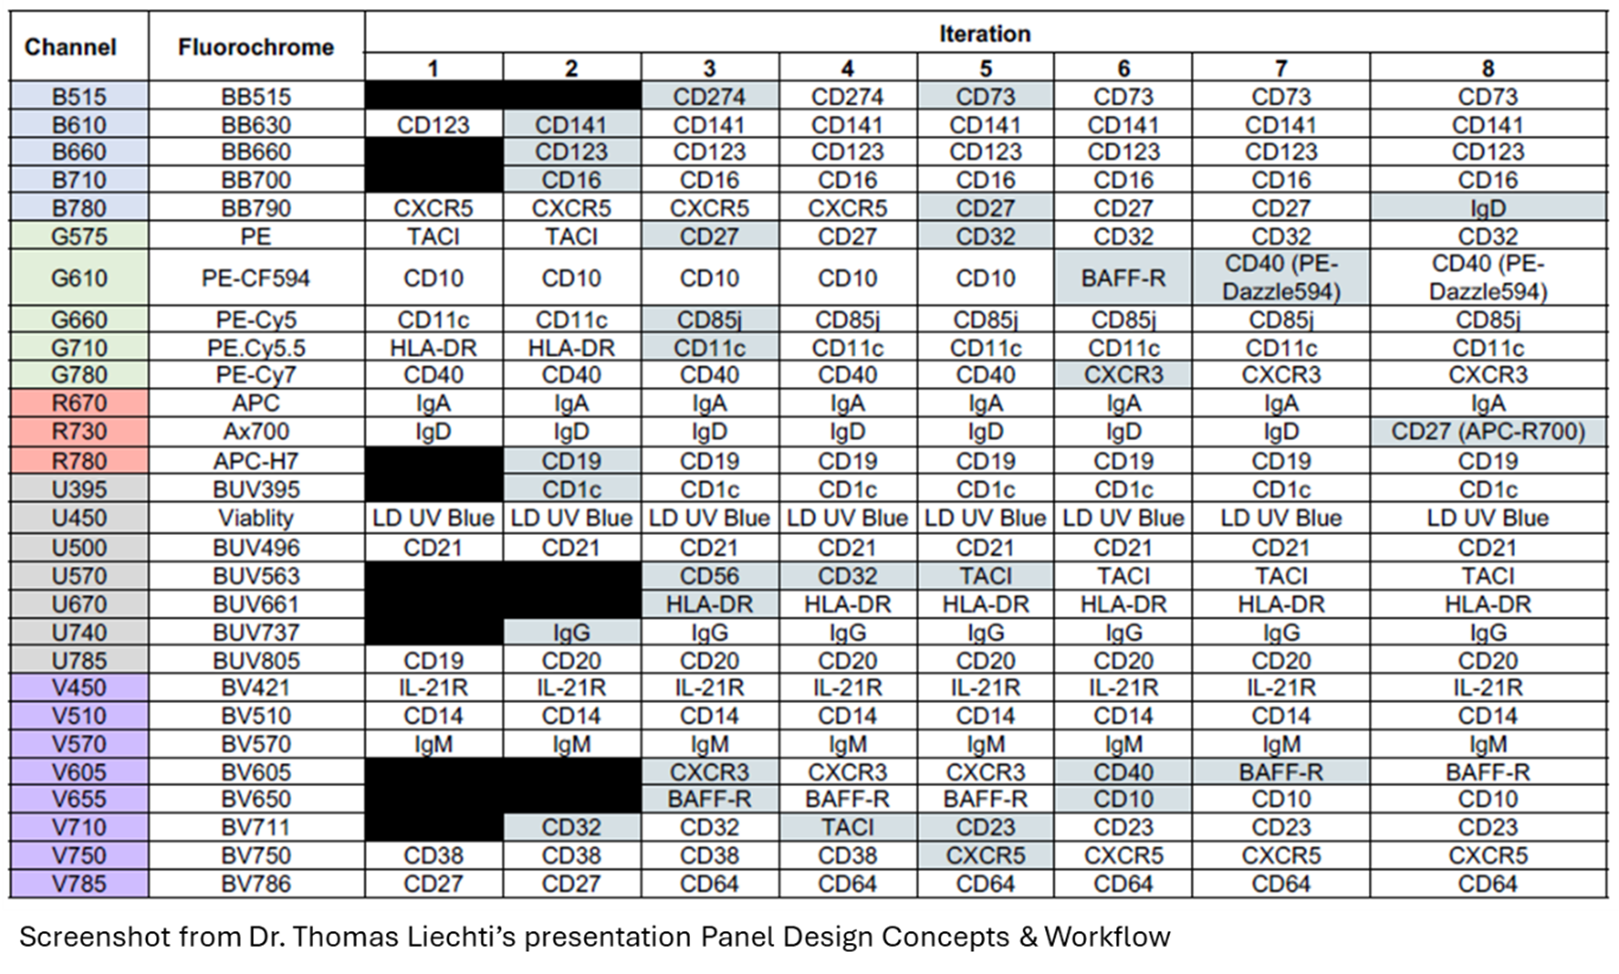
Even a well-designed panel will need refinement. Some problems are very hard to anticipate ahead of time. For instance even the well cited OMIP-069 (link) underwent changes after some fluorophore marker pairs proved to be unreliable when replicated.
|
|
|
OMIP-051 required eight iterations before finalization as documented above.
|
As marker numbers increase, complexity increases exponentially. You may need to:
|
- Swap fluorophores
- Purchase new antibody clones
- Reassign markers
- Adjust priorities
It's important to see this as a step in the process and not as a failure in your initial design.
|
Conclusion
This spectral course was a fantastic experience, full of many practical insights that I’ll continue sharing in upcoming newsletters. High-dimensional spectral cytometry experiments involve many moving parts, and even with experience, it can be challenging to keep track of every variable that influences data quality.
|
|
It's a good process to give yourself time to plan any panels that will need 20 or more colours to give yourself the best opportunity to get good data. That means walking through the design process deliberately, by hand, rather than blindly trusting algorithms to deliver a perfect solution on the first pass. As always, feel free to reach out to the FCF staff if you have any panel design questions, or would like help getting started in your next high parameter experiment.
|
|
|
|
|